


What is Page Setup in Excel and how to implement it
Microsoft Excel is arguably one of the most widely used software applications for data storage and data manipulation. Unlike complex relational databases such MySQL and Microsoft SQL Server, Excel is a flat file database which tends to be a lot easier to use especially when one considers the great user experience and user interface that comes packaged with the software.
According to Arkware (2022) Excel makes up the majority of flat file databases in use, with an astonishing figure of 90%. In a nutshell, Excel consists of fields or cells, rows and columns used to manage and manipulate data for computational reasons.
Page setup in Excel is one of the more frequently used features to define the attributes of how the sheet layout appears when printed. These attributes consist of the page size, margins, orientation and even the quality of the print. So how does one go about implementing page setup in Excel to achieve the optimal print results?
We are going to look at the following page setup options:
Top Tip! Bookmark this page and use the list above to jump to certain sections if you need a reminder
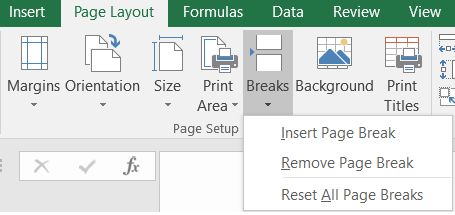
Locating the page setup options in Excel
In Excel you can easily locate the page setup toolbar by navigating to the page layout option at the top of the screen.

Once you have located the page setup toolbar you will be presented with several useful options including margins, orientation, size, print area, breaks, background and print titles. All of these options can be adjusted to provide you with the ideal page layout for your sheet prints. When adjusting these options, it might be worth previewing the print to ensure the sheet layout meets your requirements.
Margins
Setting the margins of your sheet is crucial to achieving optimal prints, whether you are printing an actual hard copy document or a digital file such as a PDF. Adjusting the margins to the correct ratio will ensure that you do not end up with page edges that have been inconveniently cropped.
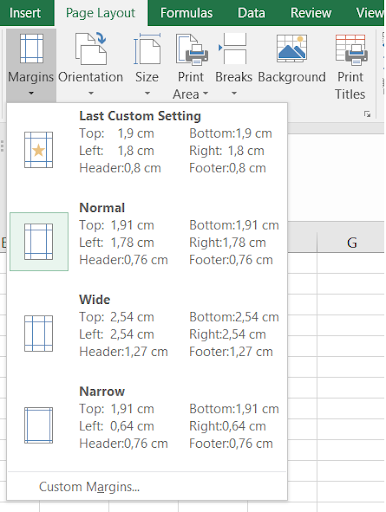
By default, Excel has several predefined margin settings that you can make use of, namely; normal, wide and narrow. However, you are also able to customise your margins based on your own preferences. Using the custom margin feature will automatically save your preferences for future use so that you can avoid having to constantly update the preferences each time you plan on using the same margin settings.
Orientation
The orientation setting is fairly straightforward; this enables you to rotate the Excel sheet between one of two settings. You can toggle between portrait mode, which is the default setting and landscape mode. In the event that you plan on printing a sheet which requires more real estate for a lot more columns, you are better off using the landscape mode.

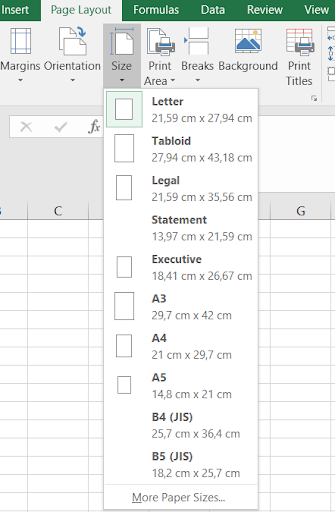
Size
With the size option, you are afforded various default page sizes commonly found with basic and high-end printers. This is particularly useful if you are not familiar with the various dimensions of page sizes – Excel takes care of all of this for you. Additionally, much like the margins setting, you are also able to define a custom page size if the need ever arises.
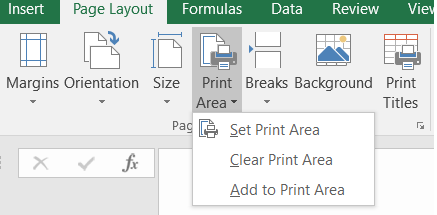
Print Area
The print area option is great if you would like to avoid setting hard-coded values using the options we have discussed before. What makes the print area option stand out is that you can simply highlight the fields, rows and columns that you would like to designate for printing and Excel will prepare your printed document with only the selected data. Once you have highlighted the data you would like to print you can simply set the print area or clear it. Additionally, you can extend the print area if you have made changes to your document by selecting the add to print area option. If you are satisfied with the selected print area you can move on to previewing the sheet by once again navigating to the file tab and selecting the print preview option.
Breaks
In order to print your data across several pages instead of a single page, you can opt for the breaks option. Quite simply put, this allocates a portion of your spreadsheet to be printed on one document and the remaining data shifts to a new document. You can also remove unwanted page breaks or reset all page breaks altogether.
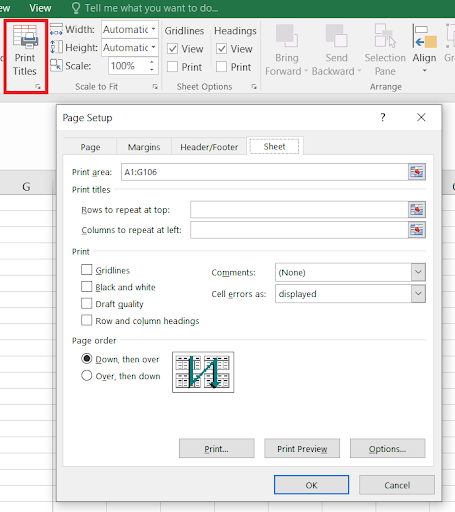
Print Titles
When selecting the print titles option, Excel will present you with the global page setup menu where you can pretty much configure most, if not all, of the settings we have already discussed. However, there are additional settings that are not immediately visible in the standard toolbar. For example, you could add a header and footer to your sheet if this is ever required. By navigating to the sheet tab, below the print section you can enable the gridline option. This is quite useful when you want to add gridlines in the printed document and from a visual perspective, this makes it easier to visualise the rows and columns that separate the data. If comments were added to your spreadsheet and you would like to maintain and view these comments in the printed document, you can simply enable this option too.
Using page setup across multiple sheets
By default, each sheet in an Excel document will need to be set up individually. However, it is certainly possible to define the page setup attributes such as margins, orientation and all of the above across multiple sheets. The easiest way to make these global page setup changes across multiple sheets is by following the below steps:
- On a Windows machine, hold down the CTRL key and select each sheet in the workbook by clicking down with your mouse. This should highlight all the sheets that have been selected.
- Navigate to the page layout option, here you will find the page setup toolbar that we have discussed.
- Simply configure the attributes you would like to change and this will apply all changes to the sheets that you have selected.
- To verify that the changes have been applied, you can select each individual sheet and navigate to the print preview option.
Want to get more familiar with Excel? Consider taking our Corporate Excel Training Course.